
Previously, we gave all the background needed for mapping our own portion of Antares in a usable form. We also outlined how Antareans produce simple, but usable, maps that can be understood by humans rather than the complex machine intelligences of the major factions. The next step is locating somewhere we can map and then running through a process that locates systems in those areas.
Useful Shardhexes – our own locations
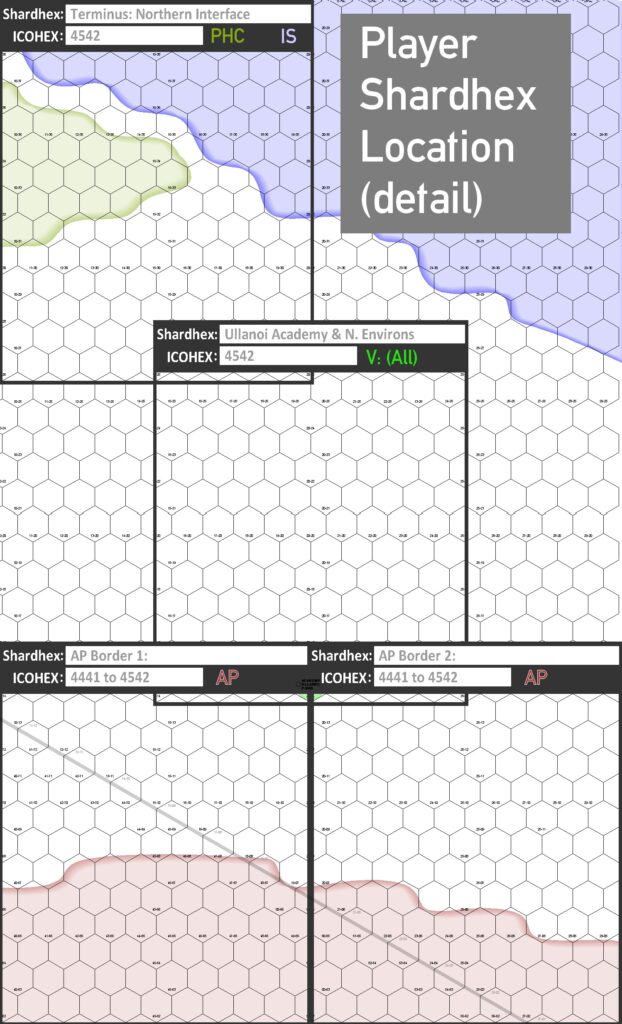
At present, we have identified four, linked shardhexes in the NNW Determinate. One is located at the terminus of the Northern Interface in the north of the Determinate – a hotbed of Concord-Senatex conflict – and the others are south of that, potentially involving conflict between the Algoryn, locals, Freeborn, Boromites and those local systems who have allied themselves with the Concord and Senatex and who have called in military support.

The central shardhex of these four links them all together and includes the Freeborn Academy Ullanoi, a planet used as a neutral training centre and university by all Freeborn vardos in the area, including Houses Delhren, Isoptix and Oszon. Ullanoi itself has been declared independent territory by all Freeborn, establishing the system as a diplomatic neutral ground that even the Concord and the Senatex respect. However, systems and planets surrounding Ullanoi might make for some interesting conflict between almost all the factions and even a long distance Ghar destroyer on an exploration mission.
Each shardhex can be mapped as players wish, though we provide guidelines below. The individual shardhex templates as well as an empty template are all available as full-sized downloads here. The blank shardhex is for players to locate their own shardhexes wherever they wish. A good example of a interesting location might be on the borders of the Algoryn Ovest-Harn Shard and Ghar Quadrant XIV. Quadrant XIV was established some time before Shamasai was discovered and is the Ghar area of operations from which the Ghar Exiles first emerged. Placing the Ovest-Harn border in the hexes along one edge and having the Ghar bulge out a little of the other might make for some interesting combat for control over the intervening gates as the locals desperately seek aid from the Prosperate or Concord!
Generally, the Prosperate areas of control are shown in deep red, the Concord in mid green, the Senatex in turquoise-blue or mauve and Ghar in deep purple. Bright green areas are those controlled by the Freeborn – in the case the mutually-controlled Academy Ullanois. The grey areas are voids, areas of the Antarean surface where there is a distinct scarcity of gates. A closer look at the relationship of the four shardhexes in icohex 4441 and 4452 is shown in the detailed extract.
Where are the Gates?
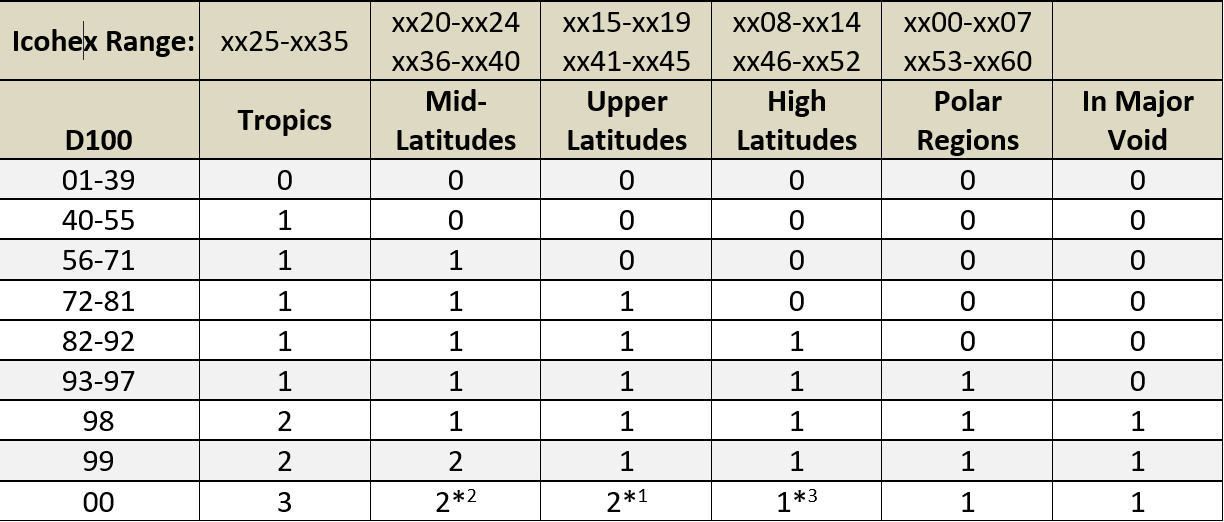
To identify the chance of a gate being present in any particular subhex, we need to keep in mind that gate density on Antares is greater near the equator. We’ve abstracted this already to produce a simple table that shows the number of gates present in each subhex.
To determine whether or not a gate is present roll D100 for each subhex, cross-reference the result with the column on the Gate Presence Table corresponding to the latitude of the icohex. The result indicates the number of gates in that subhex. For example, a 47 in the Tropics gives 1 gate in the subhex.
For those interested in such things, the average number of gates per icohex at each latitude are: Tropics, 2340; Mid-Latitudes, 1692; Upper Latitudes, 1080; High Latitudes, 684; Polar Regions, 288; and Voids,108. Antares really is huge!
The player shardhexes are all at icohex latitude xx41 or xx42, so all use the ‘Upper Latitudes’ column. Where a subhex is in a major void, use the ‘In Major Void’ column but when mapping a shardhex, natural, small voids will be created on your own map, especially in the higher latitudes, but there is nothing wrong with deliberately sketching out a small void to isolate a few gates or to make travel or campaigns more interesting.
Gate Presence Table
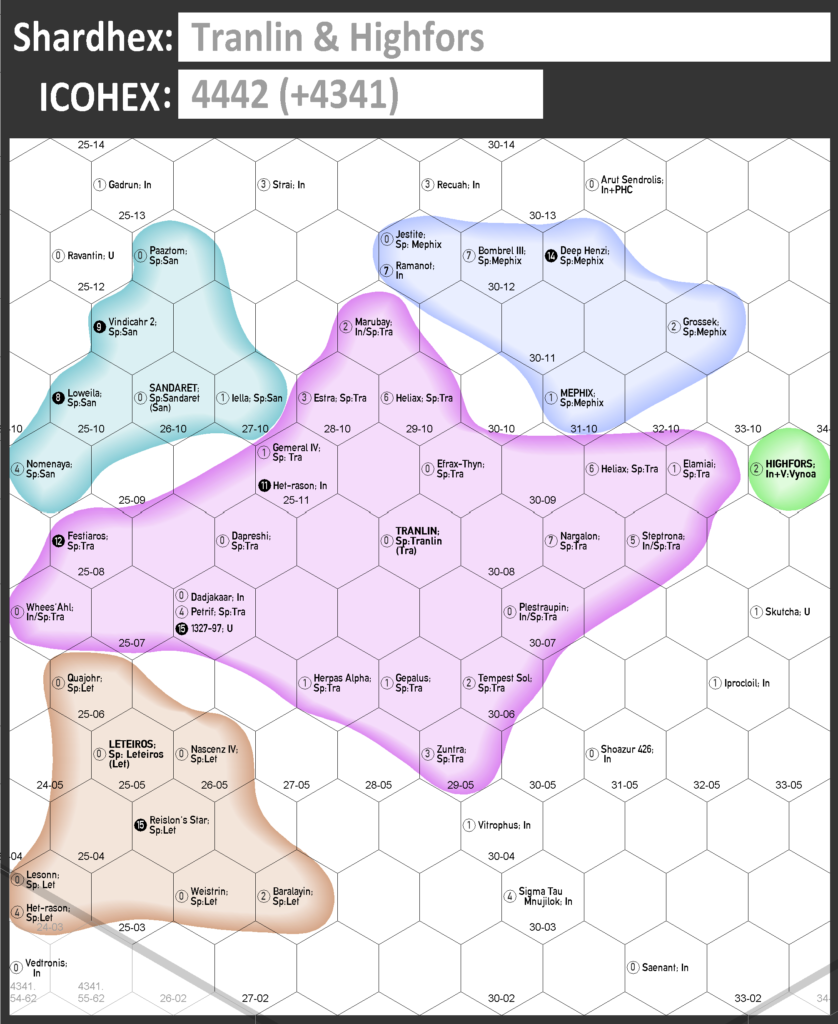
* An additional gate can be added to these subhexes by rolling the number specified or less on a D10. So a third gate might be present in mid-latitude hexes on a roll of a 00 followed by a roll of a 1 or 2 on a d10. Of course, it may make narrative sense in your own campaign to add a 2nd or 3rd gate in a subhex – we have done such in our sample shardhex, for example at subhex 26-07 (see the annotated subhex diagram – the map of Tranlin & Highfors was given in the last part of this series and can be seen here)!

Gate Depth
A key aspect of a gate navigation is the depth at which a gate lies. Luckily for travellers, there are far fewer gates at the dangerous depths. To locate a gate’s depth, roll a D100 and look up the depth on the Gate Depth Table: where a result comes up beyond the critical depth (level 9 or below), another, 2D10 roll should be made to determine where in the depths of Antares the gate is located.
When rolling for multiple gates in a subhex, reroll any gate depth result that is within two depth bands of a previous gate in that subhex: Antarean gates do not occur in close proximity at the same depth. For example, if the first gate rolled is at depth 3, then a subsequent gate would have to be at depth 6 or more. In the annotated example above, the first gate rolled for was Petrif at depth 4 (an 85) and we had to reroll Dadjakaar when it came up with a depth 2 (72). This means there is a faint possibility that a subhex might have three gates all below the critical depth.
Antarean Gate Depth Table
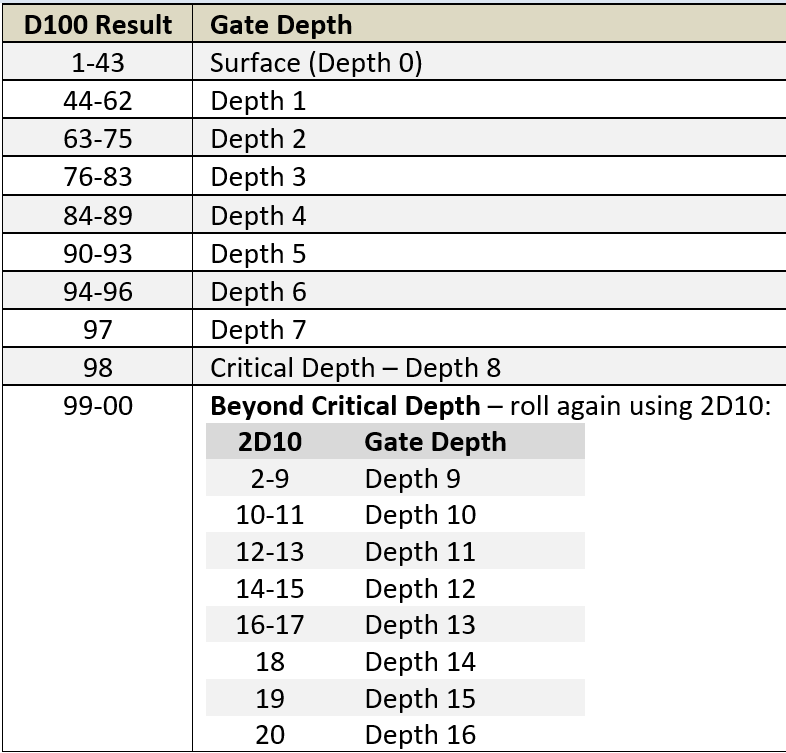
As can be seen, there are significantly fewer gates the deeper into the interior of Antares a ship travels. Gates can be ‘hidden’ and are sometimes impossible to detect by the presence of a gate very close to them, or if the deeper gate is at levels 14-16 and a second gate is near the surface.
When marking gates on a map, the convention is to show the gates in sequence from the shallowest to the deepest. Gates are shown by a circle in which the depth is stated: those above the critical depth have hollow circles, those below critical depth (level 9+) have filled-in circles. Some maps use the colour red to indicate gates beyond critical depth and emphasise the danger!
Gate depth symbols can be draw by hand or if using a drawing package you can use one of the template gates in the attached zip file.
Name and Affiliation
As can be seen on the annotated subhex, the gate depth symbol is followed by the name of the system, then a semi-colon and finally the political affiliation of the system – such as Independent (In), Concord (PHC), Senatex (IS), Freeborn (V – for Vardosi) or a Spill fiefdom.
Spill affiliations are shown by a ‘Sp:’ followed by the name of the Spill fiefdom or by a three-letter code for the fiefdom – in our example Shardhex, Tra is used for Tranlin. If a system hosts a capitol of a faction or fiefdom, then the system name is in capital letters. If long, this is sometimes followed by a short code used by other gates on the map to indicate affiliation, such as LETEIROS (Let) at Tranlin 25-05. Note that MEPHIX at Tranlin 31-10 has no short code and its affiliated systems just have ‘Sp:Mephix’.
We’ll have a more in-depth look into affiliations and the Antares system code in the next instalment in this series.
Summary and Downloads
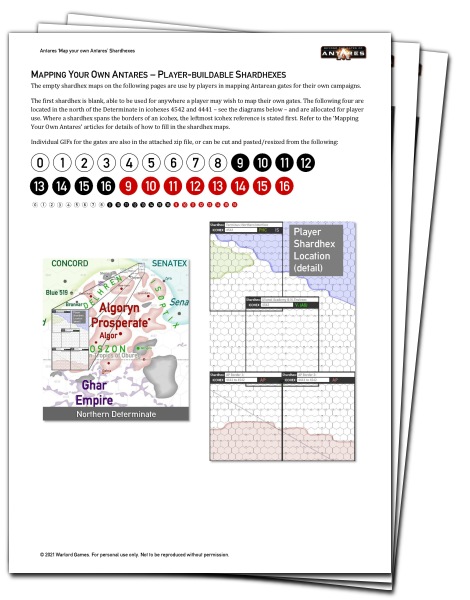
That’s it for this week. There are links below to a downloadable zip file with a PDF of each of the four shardhexes mentioned here plus a blank shardhex layout, together with some gate depth .gifs that can be resized and used in placing on your own maps. There are also some gate images in the PDF which are the right size for use in the PDFs, as well.
The zipfile and its contents are for personal use only and not for commercial use.
In the next part of this series we’ll go on to add a few more details to the systems, such as gate transit times and the system’s political affiliation – something that varies wildly depending on how close the gate is to a major faction!


